Monday, September 12, 2011

feeling with the bones

There are things in you sometimes that just demand to get out. They don't care about your work schedule or your dinner plans, and they'll wake you up in the middle of the night, or sprain your ankle so you're forced to sit with them till you do something about it. They bypass the brain and go right to the body making irritating disturbances. But if you're quiet and open enough you can feel exactly what they want you to do.

The Vermont floods really got into my psyche, so did the trip back to the town and my home where I hadn't been for so long. I don't know why I couldn't stop thinking about my horse's grave, but it was an itch I had to scratch, and scratching it was to sculpt a little horse skull while I laid in bed with my ankle. When that turned out, the rest of this scene followed, revealing itself step by step exactly what it wanted. I had no idea myself where it was going, it didn't feel like it had a point or purpose. But when the torso cracked in the oven because of a poor mix of clays, without missing a step I felt my fingers making a rose to grow out of the crack. Adding that last detail was deeply satisfying. It's funny how the soul works things out without you even knowing it.

Still not quite finished, but most of the pieces in place after two days of obsessive making.


Sunday, September 11, 2011

studio 9-10-11

Apparently I get the most work done when I'm incapacitated. Yup, I'm incapacitated yet again, this time a giant swollen sprained ankle I'm trying to stay off of. I've got it propped up on a cot in my studio, finishing up some half finished projects. Some hipstamatic snipits of the many things growing in here right now.


Friday, September 09, 2011

love fish


Did some watercolor for the first time since college for a friends' wedding card (the ones who got married at the aquarium, of course). I'm out of practice, but I can't believe it was actually fun.


Thursday, September 08, 2011

paper doll & stage how to

I'd always wanted to make paper dolls. I'd had a bunch as a kid, this one was my all time favorite, and when I dug it up recently I was flooded with distinct memories of carefully cutting out all the dresses. I loved that it came in a package with a little window like a puppet theatre stage. (This is clearly a pretty strong continuing theme.)


I wasn't sure what to make a paper doll of, until my friend and go-go partner's birthday came around. Dot Mitzvah is an aerialist, roller derby skater, and burlesque artist. Her own wardrobe of costumes was ripe with paper doll possibilities. When this shot was taken at one of our go-go shows with the surf band, the Clams, I knew this was the pose for it.


I printed out the photo to the size I wanted the doll, just big enough to fit on 8.5 x 11 paper. I traced her on tracing paper, changing her costume to something easily coverable with other paper outfits. I xeroxed the sketch (copy machines have waterproof ink, unlike inkjet printers), glued it down to bristol board, and painted directly on top with acrylics. I printed her out on card stock, cut her out, and I had a doll to work off of.


I used the same method for the costumes. Using photos from her events I sketched her costumes on trace paper right over the doll so they would be precise. It was tricky figuring out which body parts to include in the costume, and which of the original doll would be exposed. This took a lot of trial and error.


Again, back to Staples to make black and white copies from the sketches on tracing paper, pasted them down on bristol, and painted them in with acrylic.


I painted four costumes, then scanned them into Photoshop. This is where most of the work was. I drew all the lines in on the computer so I could revise them. This was all the tabs for each costume that fold back on the doll so they stay on. This was hard, and took a week of experimenting, by printing them out and trying them over and over. I had to manipulate some of the painting in Photoshop because they were never quite perfect. It's a very precise art form. I had little paper dresses all over my studio.


I wanted her to have her own stage that was part of the packaging of this kit, so I scanned in some theatrical etchings from a Dover book of ornamentation, and with piecing elements together in Photoshop, built up a proscenium and back drop.

I altered the color to be a nice old sepia tone. Because Dot is a burlesque performer, I wanted an old vaudeville look.

Packaging was an important aspect too, because I wanted to give these to her as if they were a printed published kit, and I wanted her to be able to sell them or give them to her fans. To economize on paper I placed the Dot doll in the proscenium to be cut out. Here I had to go into Photoshop with that darn pen tool to make lines for her stand, and add directions for construction, also a very important and complicated task.


Engineering the stage was also tricky, but I went with a tab system, and with just 2 pieces of nice card stock made a sweet little 3-d stage. I am so excited about this stage! It's a step towards those elaborate paper theaters I've been obsessed with since I first saw them in the Albuquerque folk art museum.


Then I set her costumes up with titles, honoring each of Dot's many characters. These two are from our go-go group, the Nouveaux Pony Banditos.


After I'd tested all of these endlessly with print outs from my Epson, I took them to Tyco printing in New Haven and had the amazing Kick do her color copy magic with them. On good card stock paper, they came out gorgeous! I'm so happy with the rich color, sharp details, and the feel of the paper.


The kit is backed with an instruction sheet with photos of the constructed piece. The 5 sheet kit fits in a clear print sleeve, and looks very handsome. They'll be up on an Etsy site soon.


Sunday, September 04, 2011

hometown

After putting the word out in Connecticut, my friend Caitlin and I collected a mountain of food, clothes and supply donation for flood relief in Vermont that barely fit into her suv, and headed north for my hometown of Wilmington. I was unsure if we could, or even should go there, because of the dire state of the roads. But with all the conflicting information on the internet about what was going on there, and what they needed, I had to go find out myself.


We weren't sure if the route we chose would even be passable. It was, but barely. In many places the road was more then half gone, fallen into the creeks, and just a few orange cones directed you to drive precariously around it. There is so much to fix, with such massive amounts of new rock and fill to be brought in, it seems an impossible task.


In Wilmington we dropped off our carload, and drove to my old house, formerly the Fjord Gate Inn and Farm. I was obsessed with the idea that the bones of my horse, who we'd buried next to a pond, had been uprooted and floated away. The grave was fine, the inn now whitewashed and seemingly long-since closed for business, our old pastures and barn completely overgrown and abandoned. The bridge next to it missing a large triangular chunk of cement. It was apocalyptic. It was a strange thing to see.


In downtown, the volunteer work crews had wound down for the day and not many people were around other then police guarding the closed road areas. I checked on the places I could get to that had been intrinsic to my youth. Happily, Memorial Hall, the place I fell into theatre, looked pretty good, being slightly on a hill.


But just next door, the Incurable Romantic, once filled with fairies, victorian hats and all sorts of things that I coveted, was now full of the grey toxic muck that came with the flood and clings to everything. Across the street, the relocated Bartleby's Books, is gutted, nothing left. And the 111 year old Dot's Diner, the only place a teenager in the 80s could afford to hangout, is a broken box balancing on a few lose rocks on the edge of the river, the roads fallen in like a moat all around it. A few guys lingered on the porch of an unidentifiable restaurant nearby with a box of dusty liquor bottles, drinking beer and kindly offered us some.


The dramatic ancient cemetery where I idled many hours drawing grave stones as a teenager was thankfully ok.


We didn't stay long, wanting to get off the roads before dark and new rain. The ride home with the pink sunset over the silvery grey coated fields offered a whole new palette of light probably not seen in many places.


I'm happy we got some donations in, but with Vermonters worried most about their roads above all, I'll wait before going in again. I am glad I saw my hometown. Despite not having been back in a dozen years, I found pieces of me are still there, uncovered from their burial grounds by the hungry water. Back home in my untouched coastal house in Connecticut, I pick over the river-washed bones.


Tuesday, August 30, 2011

badges of honor and flood marks

I've just learned that this blog feeds onto sites I was unaware of, causing me to have readers I don't know, and didn't know about. That's awesome! Thanks for reading, however you came to see these posts. Now I'm compelled to explain myself in more detail, since it's not just my mom and two cats I'm posting for.

So let me tell you about these merit badges. I can't express in words how much I love badges. I cannot walk by an army navy store without going in to dig through their patch bins. I even love the name patches on utility shirts. Why is this? I'm sure it originated in my childhood (as the root of all obsessions do) when I was a member of several badge-driven activity clubs, starting, of course, with the Girl Scouts. Though my memory of actual events in the Girl Scouts is hazy, I can remember the badges so clearly I can feel the stitches. I was crazy about the badges, and how they would fit on my sash, and how much space should be left between them in order that I could fit many more.


(Brownie "Puppets, Plays, & Theater" badge!)


In sharper focus is my memory of the club I left Girl Scouts for, the Indian Princesses. Yes you read that right. Though now considered inappropriately named and apparently disowned by the YMCA which founded it, this was back in the 70s before they figured that out. Indian Princesses was a bigger deal to me then Girl Scouts because Indian Princesses was a father-daughter outdoor club, and I was the only girl I knew whose father had died, making it impossible for me to join. But my best friend Whitney lent me her dad, and the three of us went to Indian Princess club together. We made native american inspired crafts, went hiking, and tacked badges of accomplishments onto the tan felt vests we wore. It was marvelous. I mean, look at this!


(That's not me, by the way, that's an amazing web find.) We had to come up with an "Indian" name for ourselves. I was at a loss, so a girl in the club gave me the name of her retired sister. It was "Morning Dove", a name I see listed on the remaining Indian Princess club websites. Of course, the bird "mourning dove" is spelled so because it sounds like it is lamenting, which was more appropriate for me then I understood back then.


And all during this time I took very formal, regimented figure skating classes with a USFSA club, with its highly organized system of testing to promote future Dorothy Hamills through levels. Which was recognized with: patches. I was crazy most of all about these patches, probably because they were the hardest to earn. My mum sewed them onto the left sleeve of a red Scandinavian patterned zip up sweater, which I wore to the ice rink with a ridiculous amount of pride.


(That IS me. I wish you could see the sleeve!) I would sit and study these patches for hours, and dream of the next one with its new 2 color combination, which I could see in the window of the skate rink office.

And even when my family moved to a rural area with no scouts or princesses or ice rinks, I still managed to fall into a patch-club by becoming a 4-H'er.

And then I grew up, and nothing I did, no matter how accomplished and hard, would earn me a badge. I find this inexplicably unfair! Adults put immeasurable thought and effort into making fun, creative, and meaningful experiences for children, but we completely neglect ourselves and each other of the same. And I don't think it's that adults aren't interested in things like badges. In just a few hours I've taken dozens of requests for Irene merit badges. I'm not sure, but I suspect it's that we're all trying to give the impression that we're grown ups, when deep down we all know we're not, and we think we'd better hide it. But I wouldn't wish that kind of growing-up on any kid. I'd wish them a lifetime of striving for new experiences, with a beautifully stitched badge to mark each one. And so I've gotten into the habit of making badges for my friends for all kinds of things we've gone through together. This was for the first time two of my friends and I got brave enough to do a marching band street performance. We called ourselves the Boom Boom Brigade:


All of my work has the purpose of bringing playfulness and enthusiasm back into adulthood. I love working with kids because they teach me how to do this, and they alone can remind me what is really meaningful so that I can bring that back to the grown ups. Kids are my teachers. Grown ups are my life mission.

So, this is how I take the news that a big portion of Vermont is in trouble, especially my hometown of Wilmington which was totally wrecked by Irene. With collapsed roads the town got cut off, people were unable to locate their families, people lost their houses and businesses. The famous 1938 flood mark on Town Hall I always assumed was exaggerated, was surpassed. Because I couldn't get there to help or get any information, I drew while I anxiously waited to hear from my friends.

The Girl Scout's Juliette Gordon Low said this: "Badges show that you have done something so often and so well that you can teach it to someone else." Vermonters, and many people in other states, have a long haul ahead to put their lives and communities back together. By the time roads and houses are rebuilt, they will be experts. As in tragedies that happen everywhere all the time, most of them won't get any recognition for what they've been through. I made this for my friends because I want them to know they are seen.

There are lots of ways to help, by the way, from financial donations, to physical volunteering. Here's some pages with good resources:


(I'm relieved to report that my mom is a-ok.)

Hurricane Irene merit badge


If you want one (and of course you do), either find me or email your snail mail address to me at merfire@gmail.com. 2 1/4 inch fabric patches you can sew on anywhere you like.

Sunday, August 28, 2011

refuge

The anticipation of Irene brought my porch garden in to the living and dining rooms. It's like a tropical jungle in here with all the foliage and steamy pre-hurricane humidity. The tomatoes are making the place smell so good. Another pleasure of a storm.


Saturday, August 27, 2011

storm poem

New Haven, Connecticut looks to be on Irene's agenda this weekend. This'll be my first hurricane as a coastal resident. I've got to take at least one trip down to the sea before things get too wild, then I'll burrow down with some projects and poetry. Starting with this.

I can tell by the way the trees beat, after
so many dull days, on my worried windowpanes
that a storm is coming,
and I hear the far-off fields say things
I can't bear without a friend,
I can't love without a sister

The storm, the shifter of shapes, drives on
across the woods and across time,
and the world looks as if it had no age:
the landscape like a line in the psalm book,
is seriousness and weight and eternity.

What we choose to fight is so tiny!
What fights us is so great!
If only we would let ourselves be dominated
as things do by some immense storm,
we would become strong too, and not need names.

When we win it's with small things,
and the triumph itself makes us small.
What is extraordinary and eternal
does not want to be bent by us.
I mean the Angel who appeared
to the wrestlers of the Old Testament:
when the wrestler's sinews
grew long like metal strings,
he felt them under his fingers
like chords of deep music.

Whoever was beaten by this Angel
(who often simply declined the fight)
went away proud and strengthened
and great from that harsh hand,
that kneaded him as if to change his shape.
Winning does not tempt that man.
This is how he grows: by being defeated, decisively,
by constantly greater beings.
-Rainer Maria Rilke

Monday, August 22, 2011

ashes and snow


This is a photograph by Gregory Colbert. Years ago his photos of people with animals were all over the commuter trains to New York. You could stare at them the entire trip and become lost. They were part of a traveling exhibition called Ashes and Snow. I'm so glad to see it is still going, and the website has expanded into an audio/visual/video experience. I'm putting in the permanent link list, I hope you visit.

Wednesday, August 17, 2011

big puppet build

As promised, the giant puppet "tutorial" in one giant post. Are you ready?

There are lots of ways you can make a big puppet, and lots of ways you shouldn't. I discovered a few of both during a recent build. I also found some fixes to my mistakes, so you can use this as a companion guide to your own build. For more thorough resources on the web try the Puppeteers Cooperative's 68 Ways to Make Really Big Puppets, and the Hillsborough Arts Council parade puppet instruction site. Most importantly, like all puppets, you can start with traditional methods, but it usually comes down to doing what works for that particular puppet because with so many variable factors, they all have a unique mind of their own. Puppet building takes a willingness to experiment and make mistakes, and the ability to change course depending on what unfolds.

I've built giant animal puppets for large groups of puppeteers to operate together, but I'd yet to build a traditional upright human puppet with the back pack system for one person as famously used by Bread & Puppet, and I've wanted to try one for a long time. I envisioned a fleshed out conical body, not just hanging fabric you often see on parade puppets. I wanted it over 10 feet tall.

With 2 weeks to build before the scheduled performance, I decided to use an existing big papier mache head I'd built spontaneously several years before. The head was a bit heavy, about 2 feet tall with a chicken wire armature and lots of paper layers (straight up flour and water and newspaper mix). But I'm strong and in good shape, so I figured I could take it for a 2 hour performance.

I'm also pretty bent on using existing materials. This is what I'd gathered up from around my house including the head:


OK, so half of this wasn't from around my house, including the walker and ratan. Let me tell you about the walker...


Ultimately, I wanted a metal frame backpack like you're suppose to use. I'd been trying to score one for years at the Goodwills, but no luck. In desperation this time, I looked around for anything similar. One thing that was plentiful were old walkers, and they too were light weight and super strong metal frames. And turned upside down, they had four hollow channels to insert poles into if desired. With a little padding and added straps, how could this not work? This was BRILLIANT! For six bucks I brought home a revolutionary idea in giant puppet building. (Well we'll see about that.)

The other acquired material was ratan. I'd seen my co-builder Jen on Luna's Sea use it for her seahorses and giant angler fish. I needed to stay as light as possible to compensate for the heavy head, so off to the ratan supply store, I picked up some bundles, and on the advice of the store owner, a 10 foot ratan pole for the spine instead of bamboo as is traditionally used. (Keep this point in mind.)

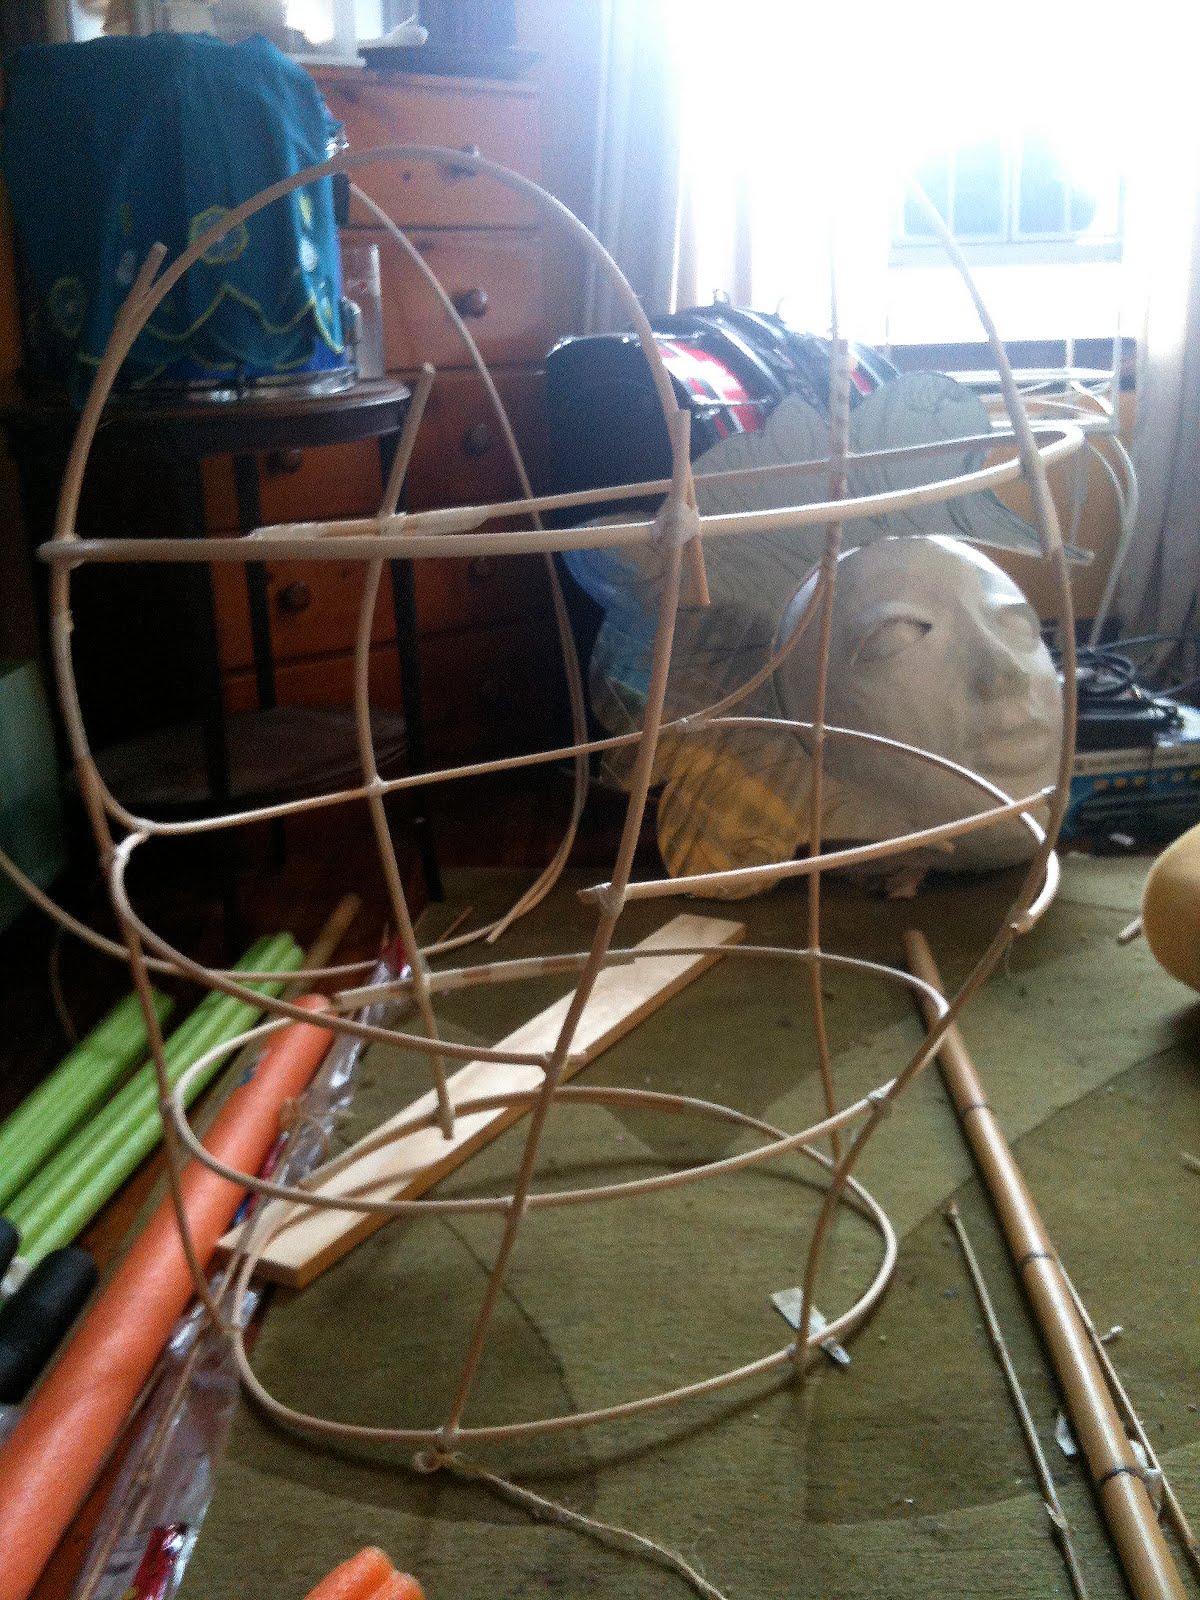
I began work, starting with the ratan torso. I'd watched Jen make elaborate and well planned jigs to shape her structures, by wetting the ratan and letting them dry around the nails. I, being not so planning-oriented, figured I'd wing it. Using cord and fabric strips I tied the wet ratan into basic S shapes. I measured nothing.


This did work, the ratan took on the new form beautifully. That was exciting. I began "sketching" out a torso by free-form gaffer-taping the ratan together. Again, no measuring. I ended up with something that looked pretty good and sturdy, though very flexible. It seemed the tape alone even was good enough.


Knowing I'd want something to sew the costume onto, I took eggshell bedding foam, and cut to shape over the ratan like skin, using fabric glue at the seams. I do not have a photo of this, because I quickly realized this was no good. The tightening of the thick foam over the ratan torqued it, because my ratan was too thin and not structured enough, and, I then realized, completely asymmetrical because eyeballing it was not enough. I ended up with a giant, lumpy gob of a torso. No amount of fabric could hide it, and it probably wouldn't fit in my car to transport, a factor I'd forgotten to consider.

Back to the drawing board and time ticking, I decided I didn't have time enough to learn proper ratan. I went to an old hoop skirt abandoned from a giant octopus project. This time I pre-planned out the steps starting with a solid foundation.


I got a wooden board for shoulders and drilled a big hole for the spine pole to fit through, and two more holes at each end where the arms would attach. I hung this from my ceiling with a pulley system, to make the work easier. This was a huge help. Then I draped the hoop skirt over the board. Not feeling there was enough volume in the chest this way, I added 2 white flexible PVC plumbing tubes, which I attached onto the boards by wiring them down through drilled holes, with wood glue for extra hold. Then I gaffer taped them to 4 spots on the hoop skirt. This also gave more stability to the hoop skirt which has a lot of swing. This time I measured everything, the length of the tubing, where they attached on the boards and the skirt, down to the millimeter.


Next, scraps of foam staple gunned down to bulk out the shoulders and hide the shape of the rigid board.


Then I sewed thin foam panels around the upper torso (not the bulky eggshell this time), just enough to prevent fabric of the eventual dress blowing against the hard shape of the tubing.


Here I put the head nearby to see how my head-to-torso proportion was doing. Another challenge in making a big puppet, especially when you're in a small space, is getting a complete view of the whole. It's probably best to build outside when possible. The puppet being taller then my room, I resorted to laying out all the pieces on the floor and climbing on a ladder to get a distant enough view to tell me how my proportions were, and that still wasn't always a good gauge.


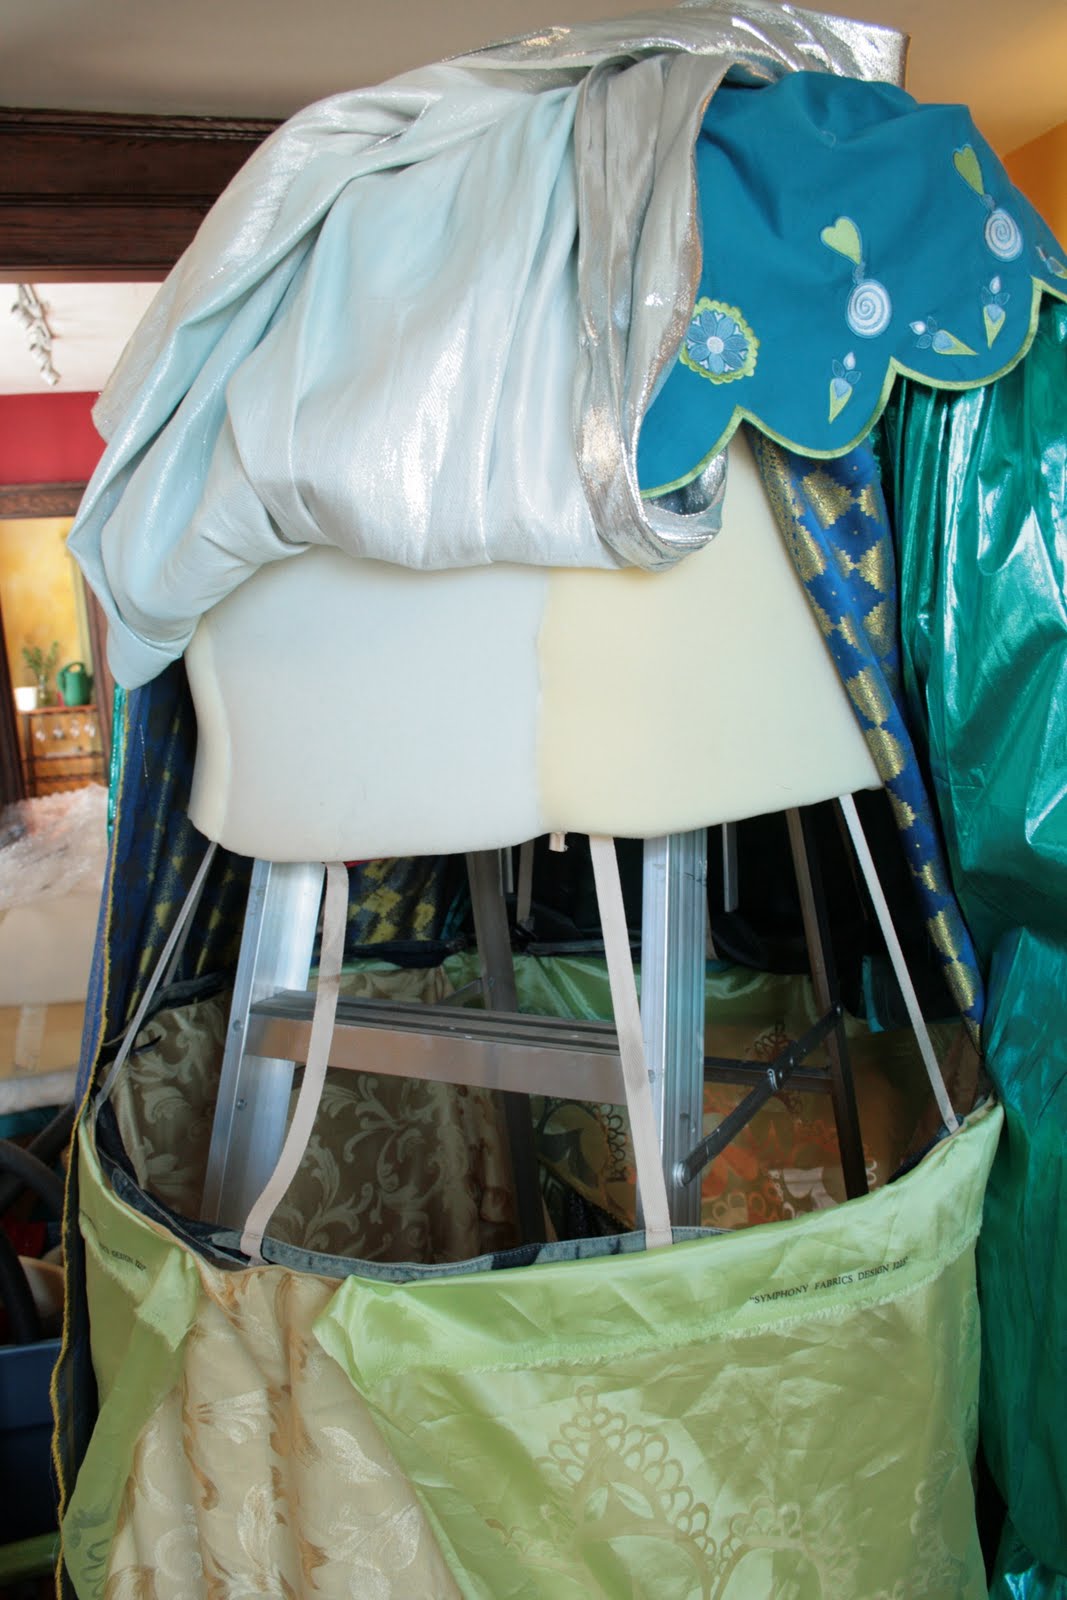
Hoisting the torso up on the pulley, and getting to work on the ladder, I started draping some disassembled Goodwill dresses and other scrap fabric onto the form, using just pins as I continued adjusting until I got the effect I wanted.


Once all was pinned in place, I put the body over the ladder so it would be steady as I hand sewed the fabric on. The upper part of the dress sewed directly onto the foam and stapled onto the board at the top, the under skirt stitched onto the lowest hoop in the hoop skirt.

The body now well on its way, I went back to that walker.


The walker needed shoulder straps, to start. I'd tried some heavy cotton straps, but in order to put on, it needed to be lose to get into, then tightened once on. I realized an old regular back pack would do the trick, and just rebuckled its straps onto the walker. Then I added hollow foam pipe insulation anywhere the metal would contact my back. Then I gaffer taped the rattan pole on, just to see if it would work, and went for a test run outside with just the head on the top of the pole.

Terrible! The head was so top heavy, the rattan pole so flexible, and the walker so unsecured to my back that the whole structure kept bending and tipping side to side, nearly taking me with it. Modifications desperately needed. First, I shortened the rattan pole by a foot, (taking the full puppet from 12 to 11 feet tall), then drilled a piece of wood onto the walker as a third crosspiece to attach the ratan spine to. Then I gaffer taped the backpack onto the walker, and added 2 leather belts to go around my waist and chest, anchored onto the bottom 2 rungs of the walker with- you guessed it: gaffer tape.

But the second test run with the head was not much better, it still swayed far too much to be safe, and endangered my back. It was clear the ratan was not the material for the spine. Bamboo has far less flexibility and would have been the right choice. With just one 6 foot piece of bamboo at hand (too short to replace the ratan), I gaffer taped that to the ratan just up to where the shoulders would sit. That did it. The third test run was tolerable, though I still was in for a workout for my back during the 2 hour gig and adding weight. But I was out of time to replace the ratan altogether.

Now, how to get the body on, and keep it on the pole at the right level?


I found these two shelf brackets, thinking I'd use them temporarily for a test run with the body. But gaffer taped on, they actually did really well holding the shoulder board up, so they stayed. No need to even attach onto the shoulder board, it stayed right where it needed to because of the foam in the body, and could easily come off for travel. Just some foam taped over the sharp ends for safety.

And here is the full back pack structure. Almost as tall as my ceiling while sitting on the ground. Time to go out for another test run, but first a break to sit down and do some less intense decorating.


The giant white head as it was, with torn and tied cotton strips for hair, and a silver crown cut from an insulation sheet. As much as I love all white sculptures, this will need color to make a splash, and I'm going with a sea theme.


I got the hair simmering in a dye pot on the stove with blue and green mix Rit dyes. Then with acrylic and sequins, did up her face.


Then I rough cut 2 very simple hand shapes out of 4 inch thick blue foam insulation, with minimal low relief paper mache sculpting so it would dry fast, because time was ticking. Then outside for another test run. One clearly-too-long arm in place (simply 2 lengths of pool noodles thread with rope, thickened with bubble wrap taped around, and tied to the hole in the shoulder board.) BUT, it was all working this time, however scrappy so far.


Last I added the lower skirts, a patterned green sheer that would act as a scrim, so that I could see out but hard for people to see in. I left a window at face level, and lined the rest of the sheer with metallic silver to hide my body. Chopped some length off the pool noodle arms, and painted the hands. I stuck thin, 5 foot bamboo poles into the bottom of the hand, almost straight in, near where the rope is tied to make a wrist. I cut small slots in the underskirts for the poles to go through, from my hands to the puppet hands. This was always awkward, and I have to research more solutions. Or maybe this is just big puppet awkwardness.


And with some glitter seaweed added to her crown...


...we were ready to go! Jen's angler fish from Luna's Sea was going to be her companion, great because this was a street fair and not a passing parade, we needed a shorter and more agile puppet to connect to the smaller people in the crowd. Off we went, packed up good for the 1 hour highway trip to Torrington.


Here she is assembled and waiting in the alley. She'll get another 3 feet taller once I'm strapped inside. Getting her on takes a big wall like this, a strong helper like Jen, a good back, and roller derby leg muscles.


And here she is up and performance ready. My head is right at the top of the the lime green fabric.


The giant and the angler on the fair midway:


This was a challenging 2 hours inside the giant. I was lucky there was not a lot of wind, as on her own she was a constant fight to keep upright. My back was never not correcting side to side, and forward to back swaying. As I got more confident, now and then I'd lean forward and kneel down, to connect with kids, but this was an extravagant move my muscles paid for the next day. Having never been in one of these with a properly built back pack system, I don't know close this is to normal strain. But I'd definitely suggest trying to score a frame back pack! The walker I think still has a lot of potential for some other forms of puppets, but I wouldn't go with it for another one of these.

No matter how challenging the build (this ended up taking me a week of full time work), the reward is always in the performance. One more video, this time from the inside.